Showing posts with label Pillow Covers. Show all posts

Tuesday, October 24, 2017

Giveaway Tuesday! Holiday Pillow Covers!

Giveaway Tuesday!

Yesterday I posted a tutorial in One Yard Wonder on how to make an accent piece with a fabric that is too overwhelming to make a whole item out of. Today I would like to offer them as a giveaway item! These would make a great gift for that friend or family who member who is obsessed with Christmas!!! 


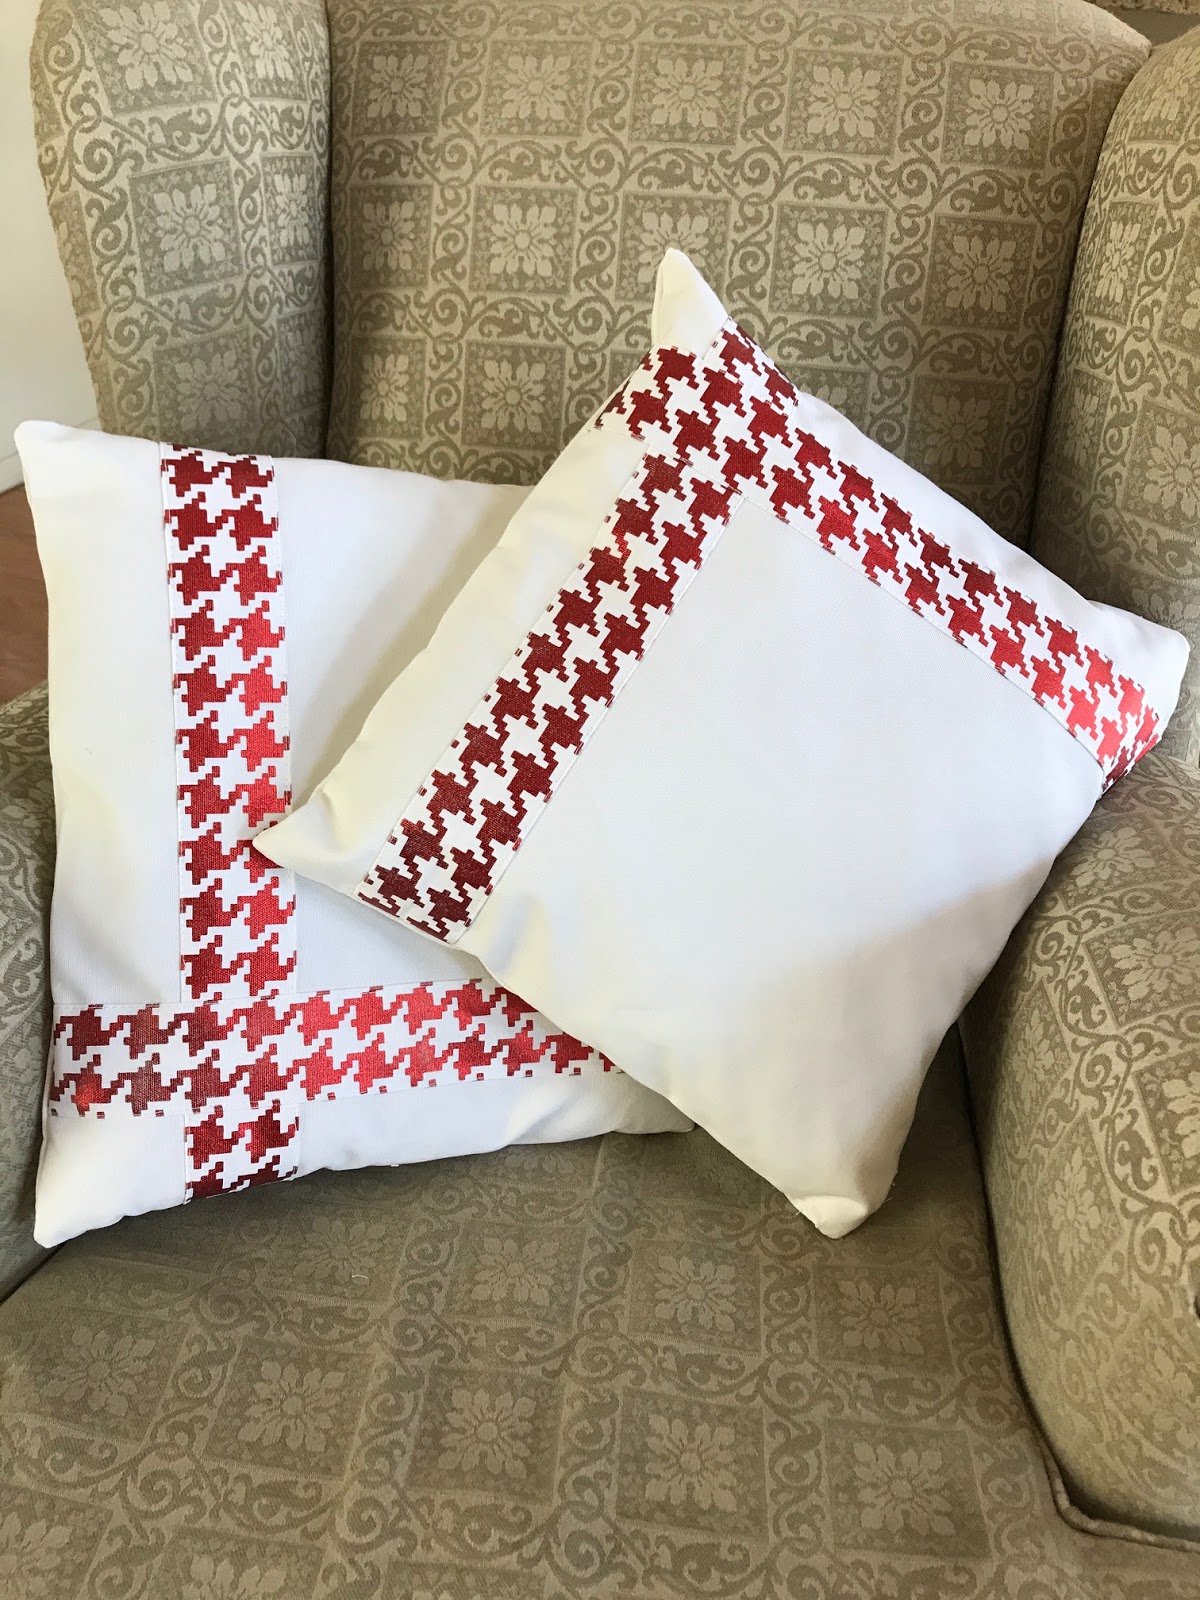
The giveaway is for a set of 16" square pillow covers made from white cotton for the base fabric and red metallic houndstooth custom made ribbon trim.


To enter, leave a comment below on the blog, Facebook or Instagram! In the comment, tell me which holiday decor item you plan to add to your collection this year.

Giveaway entries will be accepted through Thursday October 26th midnight ET.
Looking forward to hearing from you all!


Monday, October 23, 2017

One Yard Wonder Pillow

 One Yard Wonder
Pillow Cover

Do you ever find a fabric you love, but the pattern is too overwhelming to do one whole piece with it? I recommend making your own trim out of the overwhelming pattern an putting it on a solid fabric to make an accent pillow. And it only take a yard of fabric to make a pair! Here's how it's done!


First, measure and mark your pillow fabric. For a 16" cover. I do 16.5" by 16.5". Cut two of these for each pillow, front and back.


Then measure and cut your "overwhelming" fabric that you plan to use for your custom trim. For a 16" cover I did two strips of 4" wide by 18" long.


Because I am using a houndstooth pattern, I cut it so that when I lay the trims across each other the patterns will flow continuously in both directions,


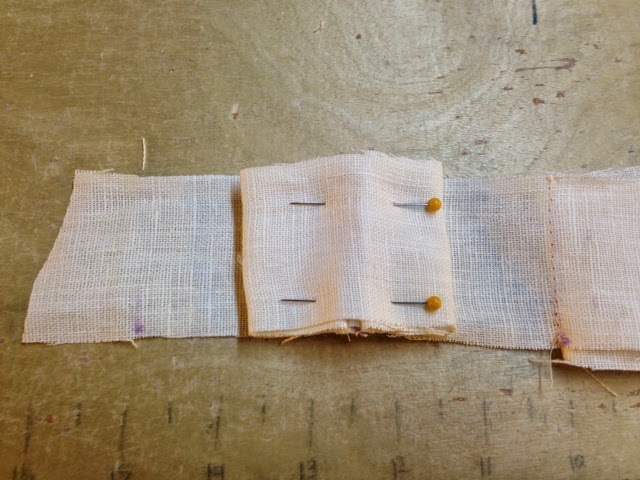
Next, fold over the edges of your fabric and iron so that it is around 2" wide. Mine was around 2.25" wide. You can make it as wide or narrow as you want so that you can have as much of the pattern showing as you want.
(I have a layer of fabric in between my fabric and my iron because the fabric is metallic and the foil melts to the iron if direct contact is made).


Then mark on your fabric where you will place your trim. I put min inset 3". Then pin your trim in place. 


Sew on the trim. I sew as close to the edge as possible.


Sew in your zipper.


Erase all your marking with your iron. And if you're wondering how that works. . . . 


This is a product called "Frixion." It is an erasable marker. It is also available in pens. It erases because of the heat from rubbing the eraser against the mark. So I had the thought one day to see if iron heat wold erase it and it did! YOU'RE WELCOME! 
They are available at office supply stores. I buy them on Amazon.


Then turn your pillow out and fill it with the pillow form! Easy peasy!

These pillow covers will be offered tomorrow in GIVEAWAY TUESDAY!! Stay tuned to enter!


Wednesday, October 8, 2014

One Yard Wonder: Ruffled Pillow Cover

One Yard Wonder! Ruffled Pillow Cover


Darling, right? Well, today's One Yard Wonder is more like a two yard wonder. I didn't use the full 2 yards, but I needed the full length of two yards. Here's what you need to make this:

Supplies:
1) TWO yards of your base pillow fabric.
2) One yard of a coordinating colored fabric to your base fabric OR grosgrain ribbon.
NOTE: I used cream and ivory linen. I like the frayed look of the unfinished fabric ends. However, if you do not like the frayed fabric look then this is best done with ribbon. The width of ribbon will depend on the size of the pillow cover.
3) Scissors
4) Marking pens, I prefer disappearing ink
5) Ruler
6) Coordinating thread color
7) Hand sewing needle and thread
8) Zipper


First, measure and cut your base pillow pieces. I made mine 14" square, so I measured and cut at 15" square.

If you are using fabric for your ruffles, you will need to cut SIX 70" long strips that are about 2" wide. If you are using grosgrain ribbon, you can cut six 2.25" wide strips of ribbon at 70" long, or 13 1" wide pieces at 70" long. That is for a 14" cover. 

If you want to make your cover larger, the way I calculated how many strips I'd need is that I had 2" wide strips and then planned to have a 1/4" gap in between each ruffle and added that to the 2" pieces until I got up to or close to 14".

Note: I cut three pieces of cream and three of ivory because I wanted to alternate colors.

Next you are going to measure and mark the loops and spaces in between the loops that will make the ruffles.

 First, leave and inch or so at the end for seam allowance. Then mark your first sew line. Your next sew line will be 2.5" from the first sew line. This is the first space. The next sew line will be 10" from the prior sew sew line. This is the first loop. Then you repeat the 2.5" gap and 10" gap until you reach the end of your strip of fabric or ribbon. 

The 10" gap is going to be used to create the loop and the 2.5" gap is the space in between the loops. With a 70" wide strip you should have measured out FIVE 10" loops and SIX 2.5" space in between each loop. 

Next, you are going to create your ruffle loops. You will do this by matching up the 10" sew lines you measured. You will need to leave the 2.5" gaps in between each loop unsewn.

Sew on the mark line. The loop you see on the right side of the foot is the 10" loop you measured.

You can see here the FIVE loops created and the 2.5" gaps in between each loop. And also note the faint purple line on the left. The space between the purple line and the loop is the 2.5" gap and the space to the left of that is the one inch I left for seam allowance when I apply it to the base of the cover later.

Take the loop and match the top center of the loop with the seam.

Then tuck in the right side of the loop to meet up with the center and seam of the loop, creating layers.

Do the same thing with the left side so you have layers.

Pin those layers down through all the layers.

Do that with each of the five loops. 
You can see that the 2.5" has allowed for each of the loops layers to meet up perfectly together with no gaps.

This is what it should look like pinned with all the layers.

Pin the strips to the base of the pillow cover. I pinned all the strips down with a quarter inch of space in between each strip. You may pin them closer if you'd like depending on what width of strips you are using. 

Sew down the center of each strip through all layers.

You will now need your hand sewing needle and thread. Take the top two layers of the stack of three layers from the loop and sew their top corners together.

You can see my sewing needle in this image going through the top two corners of the two layers to sew them together. Yes, you will be sewing a thousand little knots. Tedious, yes, but it doesn't take quite as long as it seems.

When you are done with all your knots, your strips will look like this sewn on the base fabric.

Sew this layer of the pillow cover to the back side. Sew in the zipper. Then you're done!


Should we add these to the shop???

Write me if you are trying to make this and my instructions aren't clear. I'm really good at vomiting instructions on a blog into a big awkward mess that no one can understand. So let me know if you have questions. 

Happy Sewing!


Monday, December 9, 2013

Client Appreciation: See the window treatments in action!

See some of our window treatments in action and get ideas for our own space.
 
These hidden tab panels were a project I did with JSW Interiors. The fabric they are made from is called Green Bean Beads.

These Flat or Classic style Roman Shades were made for a client of ours out of Richloom Evelynne, colorway is Graphite. These shades are a good representation of how we make each shade identical so that when they are being hung next to each other or in the same room the pattern starts in the same place on each window treatment.

This is a  French door curtain that was custom made for a client with a ruffled rod pocket at the top and bottom of he curtain. It also has a 3" wide sash in the middle with Velcro attachment that can be adjusted so the gathering can be as much or little as you like. The fabric tis curtain is made out of is called Hollyhock by Shumacher. We ordered it through Lynn Chalk's discount designer fabrics.

And finally, a blackout lined flat roman shade,
 
to match these rod pocket valances,

 
and matching pillow covers and baby blanket (blanket was not created by WTbM).


Thursday, November 21, 2013

A House Project with Tara, great ideas inside!

Tara first contacted me a little over a year ago to do some window treatments for her bedroom. We have since outfitted the rest of her home with custom window treatments. If you are having several custom window treatments made, it is best to have them done by the same person that they can all be uniform. Here are some things we did for her.
 
These curtains are made out of Les Touches Green Brunschwig & Fils.  We ordered it through Lynn Chalk. We lined them with a matching green liner. You can see how the light reflects the green against the lower wall and window ledge. A subtle and pleasant little surprise without affecting the true color of the main fabric.

Now this fabric was my favorite! These are roman shades, lined in blackout, made from Lotus Blossum in Spring Green.
 

These Hidden Tab Panels are also made out of Lotus Blossum in Spring Green. They are Hidden Tab Panels lined in blackout liner.
 
We also made the roman shades over the French doors. They are made from a basic ivory linen fabric and bordered in Leaf Green and Ivory greek key trim from M and J trimmings.

This is a ruffled rod pocket door curtains with a sash. It is made out of Pyne Hollyhock in Charcoal, which we were also able to purchase through Lynn Chalk at a very reasonable price.
This fabric is stunning, so Tara decided to use it in a few places in her home.

This is a set of Rod Pocket Curtains also made from Pyne Hollyhock in Charcoal. We lined it in a pink liner. It offers a subtle, feminine look when the light shines through. It is gorgeous! Tara had a wonderful idea here to line her curtains in a colored liner instead of our standard white. Turned out breathtakingly gorgeous!
You'll notice she also has an ottoman covers in the green Les Touches. We made the matching pillow covers with the leftover Les Touches and Hollyhock.
 
Of course, it was no surprise when Tara contacted me about her next set of treatments in this stunning fabric:
 
picture from Quadrille
The fabric is Quadrille's China Seas Lyford Pagoda in Orange tint. We were also able to order this through Lynn Chalk.
We will be making this into flat/classic roman shades. Stay tuned to see how they turn out!
 
Again, If you are going to go the custom route, it is best to have all the treatments made by the same person. At WTBM, I train all my seamstresses our own patterns, but even though we are all making the same product here, I still send returning customer orders back to the person that made their other window treatments to ensure that the treatments are all uniform and identical.
 
Contact me at windowsbymelissa at gmail dot com if you have any questions about anything you've seen here today and if you want to use any of the fabrics or ideas for your own custom treatments.


Thursday, October 17, 2013

Making your window treatments last: Preserving Textiles


Let's face it: There is something about textiles that makes us want to touch them. How many of you have had to shop for your fabric in store instead of line because you have to touch it and feel it?
 
Today we are going to talk about what you can do to preserve your fabrics and make them last as long as possible.
 
There are things we can't avoid. We have to open and close the curtains,


Shumacher Imperial Trellis in Madarin

Straighten the pillows,
 
Amsterdam pillow cover from Rainey Creek Home
Situate the pouf. . .
 
Waverly Bluebell pouf from Rainey Creek Home
We naturally have oils in our skin, but additionally, we touch things throughout the day and get more oils and dirt on our fingers. Then we close, straighten and situate our the items in our home transferring the dirt and oils to our textiles.

 
We also can't avoid the sun, using lights in our homes and the occasional little person who likes to leave love notes to mommy on her couch, pillows, curtains, walls, whatever surface is nearest the crayon.
 
Let's take care of the easiest one first: sunlight. The best way to preserve your fabrics from the sun is to line your curtains. 
 
Hidden Tab Panels from Window Treatments by Melissa
Lining your curtains will not only preserve the fabric used for your curtains, or other window treatments, but it acts as an additional filter that will catch any UV rays from the sun that the window didn't already filter.
 
And I'll bet you wouldn't have guessed that the light bulbs in your lamps and light fixtures will make your fabrics fade, too. If preserving the life of your textiles is important to you I recommend getting the lowest wattage possible on the light bulbs. The worst indoor light for fabrics is fluorescent lighting, commonly used in dark shadowy areas of the home like basements. Keep this in mind when selecting a window treatment or other décor fabric going in a basement and consider using a less expensive option that can be replaced often, if necessary.  
 
Cotton fabrics, like the ones below from Bobbie Lou's Fabric Factory, are good to consider for a situation where you may be replacing items often. Stylish and affordable.


Blue Herringbone from Bobbie Lou's Fabric Factory
 
Maritime Chevron Wave from Bobbie Lou's Fabric Factory
 
Poufs and pillows in high traffic areas are also best in inexpensive cottons that are easy to wash and easy to replace, if necessary. Consider these options from Rainey Creek Home.
 
 
Chartreuse zig zag pouf from Rainey Creek Home
Utah Grommet in Spa
 
Aruba pillow cover from Rainey Creek Home

 
Now, onto the oils and dirt. Textiles are made from natural fibers. Cotton and linen are plant fibers and silks are made of protein fibers and contain salt. The best way to clean your textiles is simply to vaccume them. If a "love note" from your child finds itself on your textiles, or dirt or oil come in contact with your textiles, there are products out there that not only claim to, but do in fact remove stains and love notes from your textiles. :) But one thing you need to know is that the textiles your home décor items are made from are natural fibers and, therefore, are already undergoing their own chemical changes and natural breakdown processes. When you introduce a harsh chemical to an something that is already undergoing chemical change, you are speeding up the deterioration process.
 

Schumacher Bleecker in Spark from Lynn Chalk
Schumacher Kiribati Ikat from Lynn Chalk
  
If you use designer fabrics such as the ones above or below, you should consider the stain. Is it significant enough that you want to introduce the textile to harsh chemicals? Small dirt spots or smudges should first be cleaned by vacuum before you attempt to introduce chemicals, or even water.
 
Sheer Linen Casual Shade from Lynn Chalk
Consider the use of water on natural fibers. Cotton and linens can stand up to water. It should be distilled water as other water sources contain dirt and other elements.
 
But think twice before using it on silk. Remember that silk is a plant fiber and contains salt. Water on silk will cause it to break down and deteriorate quickly. With silks you should consider either living with the stain or replacing the item before introducing it to water, let alone harsh cleaning chemicals.
 
Schumacher Manor Gate from Lynn Chalk
If children's love notes are not a concern in your home and you generally keep a clean house, then the best thing you can do to keep your textiles for as long as possible is to purchase the most expensive fabric you can within your budget. It's true that you get what you pay for. The more expensive fabrics are higher quality and will last a long time.
 
Sinclair Grommet Panels from Swags Galore
If you have young children, and dirt and oils coming in contact with your textiles is a concern, I recommend going with affordable textiles that can be replaced often.
 
LONG STORY SHORT:
*Line your window treatments.
*If you MUST, use only distilled water, but never use any water or chemical on silks.
*Buy the most expensive fabric in your budget
*Always vacuum first before attempting to treat stains. See what the vacuum will get out first.
 
--If you see a fabric you like, click on the image to find its source.