Showing posts with label DIY. Show all posts

Wednesday, November 6, 2013

One Yard Wonder! Sprucing up the bathroom towels with one yard of fabric.


One Yard Wonder!
 
In response to our new "Ask Melissa" segment on the blog, someone asked what could be done with a yard of fabric. And so here we are. One yard wonder! We are going to bring you project ideas that are simple and do it yourself projects that can be done with a yard or less!
 
Remember our "The Ugly Fabric Challenge" earlier this year? Someone submitted this lovely fabric called "Wacky Turds." And the challenge was to make something appealing with this ugly fabric. And I made these:


Today's one yard wonder is how to make enhance your bathroom décor with less than a yard of fabric. Here's what you need:
 
1) Bathroom towels, 2) Cotton Fabric, and technically you can stop here, but I like to add 3) piping, just for a little something extra.
 
First measure the width of your towel.
In this case my hand towel is 15" wide.
 
Then you will want to cut the width of your fabric.
 
It really doesn't matter exactly how wide you cut it. The point is that the pattern gets centered. In the case, I cut to 4.5" wide. After ironing the edges over the total height will measure 3.75". The wacky turn band is only 2.5" high. The most important thing is that you get the part of the pattern you want centered. For the matching washcloths, I'd use just one row of the polka dots instead of two as seen for the hand towels and bath towels.
 
Then I cut 4" over the total width of the towel, which, in this case, was 19".
 
Then iron over the edges keeping your pattern centered. I folded the edge over to the very top of the circles.
 
 
Then place the fabric band where you want it on the towel. I recommend at least two inches. But up to four is good too.
Technically you can pin and sew at this point. But I like to add piping just to finish off those edges nicely.
 
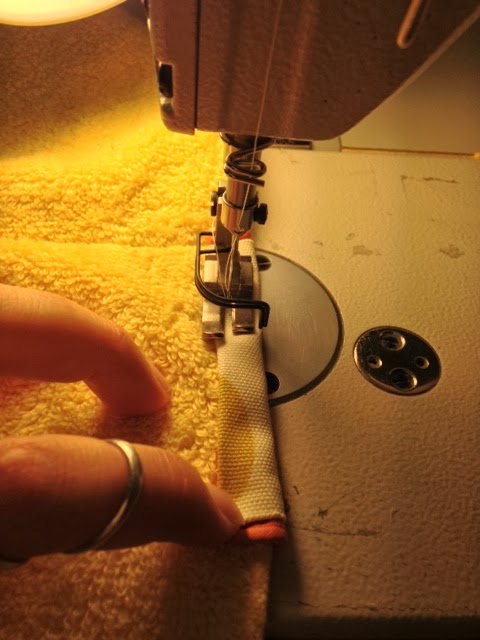
If going the piping route, tuck the piping under the fabric on both the upper and lower sides.
 
Then sew that to your towel using your zipper foot.
 
This is what it will look like after sewing on the band and piping.
 
Then you will want to iron the edges over to the back side of the towel. First trim off excess. Then fold the raw edge over once, then again so the overhang on the backside is about 1/2" over.
 
Then sew.
 
 
Done
 
Voila!
 
Each towel took me approximately 10 minutes.
 
Send me pictures of your projects!


Wednesday, August 7, 2013

A more in depth look at the fabrics you choose for your home decor

Here is a more in depth look at the most commonly used fabrics in home décor, how they function, and their advantages and disadvantages.

Cotton- When you are searching for your fabric to use for your custom window treatments, pillow covers or poufs, you if you see any of the following words in the product description it will be made rom cotton: broadcloth, chintz, corduroy, denim, canvas, seersucker, or velveteen names a few.


Cotton is a great choice for home décor because it is absorbent, cool and resists both static cling and moths. It is easy to care for as it can be machine washed, spot cleaned, ironed and bleached.


However, cotton does wrinkle easily, is subject to shrinkage and can be damaged by mildew or sunlight. There are special finishes that can be applied to your fabric to minimize these disadvantages and maximize the performance of your fabric choice.


Polyester- Polyester will be listed in the product description of a fabric either alone or in a blend with the following: cotton, silk or wool-like fabrics including batiste, taffeta, faille or percale. 


Polyester is strong, durable, warm; resists moths, mildew, pollution and wrinkles. It is a great choice either indoor or out as it stands up well to sun damage and fading. It is very easy to care for as it can be machine washed, spot cleaned and does not require ironing.


However, polyester is subject to static cling, can stain and attracts lint. But there are finishing products that can be applied to polyester and polyester blends to minimize these disadvantages and maximize the performance of your polyester fabrics.


Linen - Products containing any of the following words will have linen in them: Chambray, lawn, damask or it will be listed alone as linen.
Linen is an absorbent product that is cool and strong while resisting static cling, moths and stains. You can have it dry cleaned to keep its crispness or you can wash it to soften it.
Linen, is subject to wrinkles, shrinkage and mildew and can yellow with age. There are products that can be applied to minimize the yellowing and affects of mildew. 
 
Rayon- Rayon products will contain the following fibers: faille, challis, linen or it can stand alone as Rayon.
Rayon is easy to clean as it can be machine washed and bleached. But it is recommended to dry clean. It is warm, absorbent, drapes beautifully and resists moths.
However, rayon is considered fragile, is subject to wrinkles  and shrinkage, and is not sun or mildew resistant.
 
Acrylic- Fabrics containing acrylic typically are not blended with other fibers and usually stands alone as acrylic.
 
Acrylic is a lighter weight fabric that is soft and warm, but stable. It is durable and resists mildew, moths and oily stains and wrinkles. Care is easy as it can be machine washed and does not require ironing.
However, Acrylic fabrics are subject to static cling, are sensitive to heat and the fibers pill.
 
 
Melissa Recommends!


Trina Turk Kalaheo Print Sulfur from Lynn Chalk
Floor Poufs from Rainey Creek Home
Pre made 84" long semi-sheer curtain panel from Swags Galore

Zippy in Navy and White Slub
 from Bobbie Lou's Fabric Factory


Thursday, September 20, 2012

How to Plan a Room Makeover

How to Successfully Plan a Room Makeover

1) If you are planning to redo a room in your house the first thing you should do is shop shop shop! You should know what is out there and what your options are. I like to shop at a variety of places to get the ideas flowing. Some places I go to are department stores, craft stores, Ross, Marshalls, TJ Max, Good Will, Kirkland, Bed Bath and Beyond, home decor and upholstery fabric shops and just whatever I happen to run into while I am out at those places. If you stick to your "usual" place, like Ikea (. . . not an Ikea fan. . . ) then you are likely to end up not changing anything or buying all new stuff just to end up with a room that looks like your old one! Shopping at a variety of stores will allow you compare and contrast the different styles available to you. If you only go to one place you are limiting yourself and not exposing yourself to the updated or new styles that are out there. 
 a) Check out furniture stores that already have rooms set up so that you can imagine the functionality of certain items you are considering. It may be a good idea in thought, but when you see how a piece of furniture functions in an actual room setting, you may be surprised at the reality of it.

2) Acquire some home improvement magazine or check out design books at the library. Have some sticky notes on hand to mark all the things that stick out to you or "speak" to you when browsing.

3) Visit model homes in your area to learn the most up to date trends and to get fresh ideas.

4) Once you have gathered all your ideas you should make a plan. Whether you are just adding a window treatment and pillows or redesigning an entire room, you should have a plan. Planning will include measuring, fabric sample, if possible, pictures from magazines or written ideas from your home and furniture store visits. 

     a) Your plan should be able to answer the following questions:
          .1) What do my family and I want to be able to do in this room? Eat? Sleep? Watch tv? Do homework? etc.
          .2) What currently is not working for me in this room? What is working?
          .3) Does the room have a focal point? A fireplace? A view?, etc.
          .4) 

5) Choose a color scheme. Be sure to note when you are gathering ideas colors that stood out to you. If you are stuck here I recommend picking one thing to focus on:
         a) Perhaps a season; Spring: light and airy tones, Summer: rich, ripe and full, Fall: warm, golden hues, Winter: whites and browns.
         b) Or choose an object. Perhaps you have a favorite vase, painting or some item that has been passed through your family for generations. Select an item that is personal to you and that you are attached to and use the colors in it to choose your color scheme. 

6) Then put all your ideas together and create a notebook, packet or portfolio of some kind. Your portfolio should include the following:
      a) Pictures: every angle of the room and all the items you plan to keep in the room
      b) Any clippings you may have acquired from magazines, etc
      c) Fabric swatches and paint samples
      d) Appropriate measurement information: windows for window treatments, space for couches or chairs, space for mantle pieces or other wall surround for a fireplace, space for art, and doorways for trims or molding. 


This portfolio should help you tackle a redo by yourself. However, if you lack the self confidence necessary to make a change it may be worth the cost of an interior designer to offer some help. Don't underestimate the value your living space can add to your life and your family. If you lack the self confidence it will be well worth it to consult an interior designer. I am also always available for fabric and color advice. A retreat in your home can add so much to your mental health! I know it takes money, which is hard to come by these days. But there are so many affordable ideas out there to spruce up a room. 

Tuesday, August 28, 2012

DIY Reupholster Dining Room Chairs

Reupholster your dining room chairs!

This project doesn't take long. I think it should take about 30 minutes per chair from start to finish. But if you have a big helper, otherwise known as a helpful two year old, plan on taking hhhoooouuuuurrrrsss.
This is what the final product looks like a la my big helper ;)

The chair:
My big helper and her five year old brother are responsible for the condition of the upholstery on this chair ;)

First you will need to select a fabric that is appropriate for this project. You will need to select a heavy weight home decor upholstery fabric.

Then you will need to acquire your materials:
1) Fabric cutting scissors, 2) philips heads AND flat head screw drivers, 3) heavy duty stapler, 4) extra staples.

Then you will turn the chair over on its side to remove the seat cushion.

Using your Phillips Head Screw driver, remove the screws holding the seat cushion to the chair base.

Then use your flat head screw driver to remove the fabric from the cushion. You will be using this piece as your pattern to cut the appropriate sized piece for the cushion.


After you have used the old fabric to cut your new piece, place the cushion on the fabric and begin stapling.
Start with the sides. You will want to staple all the sides first pulling the fabric tightly.

The corners will end up looking something like this afterwards:

You will first clip off the excess, then cut a slit in remaining piece from the top to just before the base of the cushion.


Then you will tuck the remaining corner pieces under each other and staple.

Finished cushion

Then screw the cushion back on! And Voila! New Dining room chairs!
before
After