Showing posts with label Budget. Show all posts

Wednesday, December 4, 2013

One Yard Wonder: Jewelry holder

ONE YARD WONDER:
Jewelry Holder
 
 
Materials needed:
 
1) One yard of fabric
2) One yard of 3/8" wide ribbon
3) One 10 or 12" zipper
4) Coordinating thread colors
5) 8" by 10" picture frame
6) Heavy duty stapler
 
Start by selecting the following: 1) an 8" by 10" picture frame, 2) one yard of fabric and 3) one yard of coordinating 3/8" wide ribbon.
 
Next you will cut one piece of fabric to be 9" by 11", two pieces of fabric that are 3.5" high by 11" long and three twelve inch long pieces of ribbon.
 
Center your fabric in the picture frame and then on the front side use a measuring tape to measure the following:
 
With a disappearing ink pen, make a mark 1" from the top, make a mark 5" from the top, and then a mark 6" from the top. These marks will be where you will place the pockets and additional ribbon piece.
 

With an iron, iron over 1/2" of one edge of one pocket edge and fold over and iron 1" of one edge of the other pocket edge. 
 
On the remaining raw edge of each pocket, pin and sew one of the 12" long pieces of ribbon.
 
Pin the 3" tall pocket on the 1" ink line you made on the main piece of fabric. Pin the 2.5" tall pocket to the 6" line you made on the fabric. And pin the remaining piece of 12" long piece of ribbon to the 5" line.
 
Sew along the BOTTOM edges of each pocket.
 
Then pin one side of the 10" zipper to the ribbon edge of the top pocket places at 1" and pin the other side of the zipper to the 1" line you made. Then sew in the zipper.
 
Then sew around the entire outer edges of the 9" by 11" piece of fabric. Sew at about 1/2" in. Sew the single ribbon down around the edges only. Do not sew it down to the 9" by 11" piece of fabric.
 
Only sew across the ribbon that is placed at the 5" mark at the center (and on the sides when you sew around the entire edge) for reinforcement. Do not sew the rest of it to the main piece of fabric.
 
Then place the piece inside the picture frame and staple at the inner edge of the frame.

 
When you close the back of the frame, this is what it will look like:
 
3" tall zipper pocket at the top, single 3/8" wide ribbon in the middle, 2.5" open pocket at the bottom.
 
 
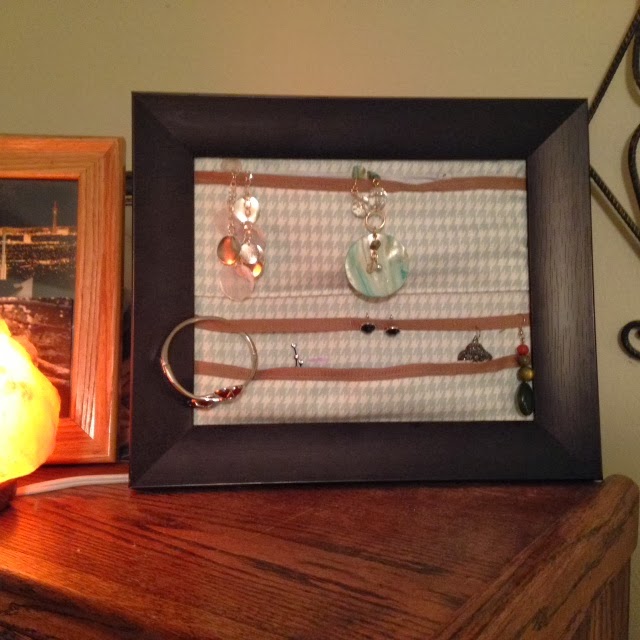
I use the ribbon to hold clasp bracelets like the below image:

 
Or to hold stud of dangle ear rings.

My open pocket on the bottom hold rings, pins and hair accessories.

The zipper pocket holds necklaces.


Enjoy! 


Wednesday, November 28, 2012

Affordable Alternatives

Affordable Alternatives to Popular Window Treatment Styles

There are some alternatives to get the look you want at nearly half the price! Consider the following alternatives if you are on a tight budget.

Option one: The Roman Shade
Roman Shades tend to get pricey for two reasons: 1) There are a lot of materials that go into making a roman shade that can really add up. They require a mounting block, cording, dowel rods, Velcro, eye hooks and that's in addition to the fabric, lining and thread. 2) They are also expensive because all of those materials take a lot of time to assemble and so the labor cost can be expensive depending on the size of the shade.

Alternative: Non Functional Roman Shade
If you just want the look of a roman but don't need to raise and lower it then consider getting a non functioning shade. A non functioning shade does not require the cord lock, cording system and eye hooks. As a result of fewer materials needed to be assembled the labor cost is also less.


Option: Pinch Pleat Curtains
Pinch Pleat curtains are costly because, depending on the desired width of the curtains, they can require up to three times as much fabric as a standard curtain panel. And, like the Roman Shade, more material means more time and more labor and more dollars!

Alternative: Hidden Tab Panels

Hidden Tab Panels pleat just like Pinch Pleats, but they only require one width of fabric instead of three. Less material=less labor=less money.


Option: Greek Key Ribbon Shade
We are extremely detailed and careful with our Greek Key Ribbon design Roman shades. We do not apply the ribbon with fabric glue (except in the case of using 1/4" wide ribbon on small curtains). First we draw the design on the shade carefully measuring so that the ribbon is equally inset on all sides. Then we measure and cut each piece of ribbon and pin it to the design we have drawn on the fabric. Then we sew it to the fabric.
THEN we have to make that into a roman shade. These run around $200+ in our shop because of the significant amount of time spent on them.


Alternative: Greek Key curtains
The first curtain is a small cafe style curtain that went in a client's bathroom and the second are bedroom curtains. The labor on these is still significant as we have to draw the design on the fabric, pin the ribbon then sew it. But we avoid the task of having to then assemble a roman shade. So that will cut the labor cost in half of that of a shade. 


If you are on a tight decorating budget take time to explore all your options and be creative. Don't settle. If there is a look you are trying to achieve just ask your interior designer or feel free to shoot me an email to discuss your options. There is always an option! 


Greek Key curtain picture and Hidden Tab Panel picture from JWS Interiors.
All other photos from The Roman Shade Store.