
One Yard Wonder! Ruffled Pillow Cover

Darling, right? Well, today's One Yard Wonder is more like a two yard wonder. I didn't use the full 2 yards, but I needed the full length of two yards. Here's what you need to make this:
Supplies:
1) TWO yards of your base pillow fabric.
2) One yard of a coordinating colored fabric to your base fabric OR grosgrain ribbon.
NOTE: I used cream and ivory linen. I like the frayed look of the unfinished fabric ends. However, if you do not like the frayed fabric look then this is best done with ribbon. The width of ribbon will depend on the size of the pillow cover.
3) Scissors
4) Marking pens, I prefer disappearing ink
5) Ruler
6) Coordinating thread color
7) Hand sewing needle and thread
8) Zipper

First, measure and cut your base pillow pieces. I made mine 14" square, so I measured and cut at 15" square.

If you are using fabric for your ruffles, you will need to cut SIX 70" long strips that are about 2" wide. If you are using grosgrain ribbon, you can cut six 2.25" wide strips of ribbon at 70" long, or 13 1" wide pieces at 70" long. That is for a 14" cover.
If you want to make your cover larger, the way I calculated how many strips I'd need is that I had 2" wide strips and then planned to have a 1/4" gap in between each ruffle and added that to the 2" pieces until I got up to or close to 14".
Note: I cut three pieces of cream and three of ivory because I wanted to alternate colors.

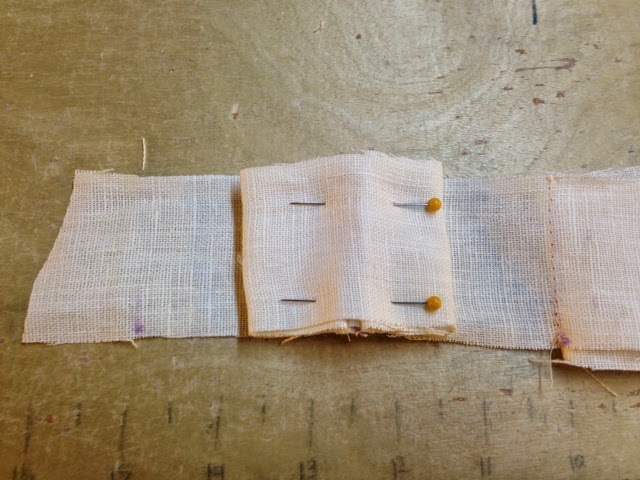
Next you are going to measure and mark the loops and spaces in between the loops that will make the ruffles.
First, leave and inch or so at the end for seam allowance. Then mark your first sew line. Your next sew line will be 2.5" from the first sew line. This is the first space. The next sew line will be 10" from the prior sew sew line. This is the first loop. Then you repeat the 2.5" gap and 10" gap until you reach the end of your strip of fabric or ribbon.
The 10" gap is going to be used to create the loop and the 2.5" gap is the space in between the loops. With a 70" wide strip you should have measured out FIVE 10" loops and SIX 2.5" space in between each loop.

Next, you are going to create your ruffle loops. You will do this by matching up the 10" sew lines you measured. You will need to leave the 2.5" gaps in between each loop unsewn.

Sew on the mark line. The loop you see on the right side of the foot is the 10" loop you measured.

You can see here the FIVE loops created and the 2.5" gaps in between each loop. And also note the faint purple line on the left. The space between the purple line and the loop is the 2.5" gap and the space to the left of that is the one inch I left for seam allowance when I apply it to the base of the cover later.

Take the loop and match the top center of the loop with the seam.

Then tuck in the right side of the loop to meet up with the center and seam of the loop, creating layers.

Do the same thing with the left side so you have layers.
Pin those layers down through all the layers.

Do that with each of the five loops.
You can see that the 2.5" has allowed for each of the loops layers to meet up perfectly together with no gaps.

This is what it should look like pinned with all the layers.

Pin the strips to the base of the pillow cover. I pinned all the strips down with a quarter inch of space in between each strip. You may pin them closer if you'd like depending on what width of strips you are using.

Sew down the center of each strip through all layers.

You will now need your hand sewing needle and thread. Take the top two layers of the stack of three layers from the loop and sew their top corners together.

You can see my sewing needle in this image going through the top two corners of the two layers to sew them together. Yes, you will be sewing a thousand little knots. Tedious, yes, but it doesn't take quite as long as it seems.

When you are done with all your knots, your strips will look like this sewn on the base fabric.
Sew this layer of the pillow cover to the back side. Sew in the zipper. Then you're done!
Should we add these to the shop???
Write me if you are trying to make this and my instructions aren't clear. I'm really good at vomiting instructions on a blog into a big awkward mess that no one can understand. So let me know if you have questions.
Happy Sewing!


There are covers and there are cushion covers that come to life with its sheers elegance. Yers, we are talking about stylish cushion covers from Indianbeautifulart. The best in the business!
ReplyDeletehttp://indianbeautifulart.com/bed-bath/cushion-covers.html
Nice article. Highly recommended. The thoughts are clear and well explained. Thankyou for sharing your work, truly worth reading. On the other hand, if you’re interested in , blinds fabrication, feel free to visit our website. Thankyou and Godbless!
ReplyDeleteYour work is very engaging! Amazing piece and is worth reading and sharing. Hoping for more of this kind of work of yours author. Meanwhile. If you are interested and looking for curtain fabrication services Feel free to check and visit our site and look for our affordable items with a very nice quality. Thank you and Godbless!
ReplyDelete